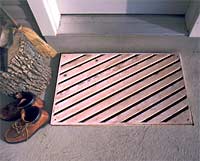
It’s mud season in a good part of the world—a good time to build this easy wood-slat mat for the entryway. The 1-by-2-inch slats do a great job of scraping the goop off your shoes, and the open design lets you spray the doormat clean with a garden hose. It’s a project that works well and looks good all year long, too. By the way, this is actually two mats in one. The two-layer construction—shown in the diagram on the next page—lets you flip the mat over when one side gets worn.

You can build a mat custom-sized for your doorway in just a couple of hours. All you need is some 3/4-inch-thick lumber (fir, pine, oak—almost anything will do), tools to cut it, and tools to fasten the pieces together. To make your mat, refer to the schematic drawing and follow the simple instructions below. While you’re at it, why not make more than one? These mats make terrific gifts, and, as the saying goes, they’re not sold in stores.
Recommended tools :
- Table saw (Amazon’s editor choice)
- Combination blade (DeWalt 10″ at Amazon)
- Circular saw (Amazon’s choice for light and powerful)
- Circular saw blade
- Finish-cutting blade
- Two C-clamps
- Cordless drill
- Countersink bit
- Phillips-head bit
Materials for one 2-by-3-foot mat:
- 1/2-inch-thick plywood, particleboard or other sheet stock, sized to fit (see text)
- Double-sided tape (check on Amazon)
- blade Deck stain
- 50 feet of 1-by-2 or other 3/4-inch-thick fir, pine or hardwood
- 1-inch brads
- 1-inch flathead outdoor screws
- 20 feet of 1-by-3/8-inch or -1/2 inch fir, pine or hardwood
- 120-grit sandpaper
Here are the steps:

1. Make the assembly base
The assembly base is your guide for the cutting and assembly steps. It makes it easy to lay out your slats, and it holds them in position as you cut them and attach the edging strips. A table saw with a combination blade is a good choice for cutting the base from plywood, particleboard or whatever is lying around. Mark and cut it so that its outside dimensions are 3/4 inch less than the outside dimensions of your finished mat will be. This is to leave room for the 1-by-3/8-inch strips that will go around the perimeter to finish the mat neatly. For the 2-by-3-foot mat shown here, the assembly base is 23 1/4 inches wide by 35 1/4 inches long. Before you cut, make sure opposite edges are parallel and all corners are square.
2. Add the slats.
As the drawing shows, the mat has two identical surfaces. Construct them one at a time.
First, cover the assembly base with double-faced tape. Next, stick the 1-by-2 slats in position. Don’t worry about cutting the angles at this stage; just cut the slats long enough to overhang the base. Start with the longest slat; place it diagonally across opposite corners of the base and press it firmly onto the tape. Then place the remaining slats on either side of the first one. Use scraps of 3/4-inch-thick wood as spacer blocks to position each slat correctly.
Note: You can cut your own slats from boards. Use a table saw and set its rip fence 1 1/2- or 1 3/4-inches away from the blade. For a double-thick 2-by-3-foot mat like the one shown here, you’ll need about 50 feet of slat material.
3. Trim the slats flush with the assembly base.
Prepare each side for cutting by clamping a piece of scrap wood on top of the slats to serve as a guide for your saw. Position it so that your circular saw blade just skims against the side of the assembly base. Then use a finish-cutting blade to trim the slat ends flush with the base, as shown in the photo. Note: If you’re handy with your saw, you can just snap a chalk line and free-cut the slats—as our expert is doing in the photo.
4. Attach perimeter strips.
Cut and fit strips from the 1-by-3/8-inch stock to fit around the sides and ends of the slats as shown. Tack each strip in place with three or four brads. Then go back and drill countersunk pilot holes and drive two 1-inch outdoor flathead screws into each end of each slat. When the first side of your mat is done, remove it from the assembly base and repeat steps 2 through 4 to build the other side.
5. Sand, finish and assemble.
Lightly sand the exposed side and edges of each mat with 120-grit sandpaper, taking the edge off the corners to prevent splinters. Next, apply a good-quality semi-transparent deck stain. Finally, join your mats together by driving a screw into each corner, as shown in the drawing. You can orient the slats in the same or opposite directions, depending on the look you want. Put your finished project to work in your entryway, where it will serve as a well-crafted welcome to friends and family alike.
//// 30-06-2023

